


Parts of a Compass
Compasses now come in all shapes, styles and sizes and, as with everything, you get what you pay for. A cheap one is almost guaranteed to let you down – and no one wants to be in a situation when that happens.
The compass I would recommend is the Silva Exhibition 4 as illustrated below.
And, so that you can fully understand the capabilities of your compass, we’ve broken down exactly what each component means
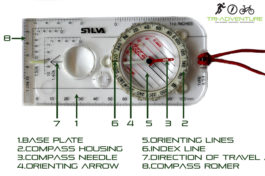
- Base plate– this is the clear compass bed, with straight edges to line up your direction of travel. It also has rulers and map scales on it to help you measure distance.
- Compass housing– this rotating bezel, with degrees etched on its perimeter to enable you to take a bearing, also holds the magnetic needle.
- Compass needle– the red and white needle floats in a clear liquid so it can rotate freely. The red end always points to Magnetic North.
- Orienting arrow– this is the wide red arrow marked on the bed of the compass housing. Align the red part of the compass needle with this arrow when taking a bearing off the map.
- Orienting lines– these lines are also marked on the bed of the compass housing, and they are parallel to the Orienting Arrow. The Orienting lines are used to line up with the Northings on a map to establish a bearing.
- Index line– a compass bearing is read off the Index line on the bezel.
- Direction of travel arrow– this thin black arrow on the base plate is used to indicate the direction in which you will be travelling after taking your bearing.
- Compass Romer – these are marked on the base plate to help you measure distances on a variety of map scales. They are also handy in helping you to accurately work out your six-figure grid reference.
Contact Us
Follow us on YouTube
Follow us on Instagram
Follow us on Twitter
Become a Fan on Facebook